October 13, 2011

September Catch-up: A month in Review

I can't believe its been a month since I last posted!  We've had a full month of launching youth and children's ministries at our church, and a month of adjusting to having Aria in all day, every day kindergarten!

We had a really HOT September... probably on account of summer not really starting until August... so we thought up some fun water activities with help from Pinterest, and some other creative moms!
One of our new favorite outdoor toys are these sponge balls!  They are super easy to make and tonnes of fun to play with.  I bought a pack of all-purpose sponges from the dollar store and used some zip-ties that I already had at home.
 
 Its as simple as cutting the sponges into three, alternating colors with another sponge (6 pieces total) and then using the zip-tie to cinch them as tightly as you can together.
 You can use different textures of sponges too to create even cooler looking sponge balls.  We like to use them in lieu of water balloons (way less mess to clean up! And they're re-usable) for water fights or water balloon tosses, or just for playing in the pool!
 We also found a great new friend in our backyard when we were moving some rocks...

 We were moving rocks so that we could set up our fabulous new swing set!  The kids have loved having their own "park" in their backyard.  August was SO crazy hot, I found I was often driving to the park, because it was too far to walk in the heat.  But, next summer, we'll be able to keep cool and have fun swinging in our own backyard in the 30 degree weather!
 Another fun activity we did to beat the heat was to freeze some toys and water in a bucket, and then hammer away to free the toys.
 I gave the kids a couple different kinds of hammers and tools to use so that they could experiment and figure out what kind worked the best.
 Aria preferred Daddy's hammer, while Roscoe liked his plastic hammer from his workshop playset.
 I tried to insist on the kids wearing their sunglasses to protect their eyes...
 But I guess Roscoe thought it made it difficult to see what he was doing.
 My suggestion if you want to try this yourself is to use toys that if broken won't cause upset children!  Some of the tails came off in the ice, and a few lost their feet or paws.  But, it kept the kids happy and entertained for a good 20-30 minutes!

September 6, 2011

First Day of Kindergarten!

Today was Aria's very first day of school!
Its a bit strange to think that every day she'll be spending most of her time NOT with me, when for the past five and a half years she has been with me almost constantly.
What will she do all day when she's at school?
Maybe a little more concerning, is what will I do?
We are so blessed to have some fabulous friends with daughters also entering Kindergarten this year, and all these friends are going to be in class with her!  How exciting!
Here's a couple photos we took to commemorate this special day... 
 SO sad that this one is out of focus!  I may have to re-stage it and try again!


A little meltdown because the sun was burning her eyes.  What a face!
Here's some back to school photo ideas I found through Pinterest.  I would have loved to have done the chalkboard idea, but sadly, do not have a little chalkboard.  The paper idea worked well for us, and maybe I'll get Aria to decorate it and then include it in her Kindergarten scrapbook.

1.  Inchmark had a super easy to do photo idea.  This was the idea I used to do Aria's photos, combined with the one below...

2.  Chickabug has some free printables to do these great photos. I like the idea of consistency and adding in the teacher's name from year to year, so I opted to make my own signs.
 
3.  Zoot had a great way of recording all your child's favorites for the year right on the photo.  A great insight into who your child is in that year of school.  I just remember filling out my "School Days" portfolio (the blue book with pockets for each year of school) with things like who my friends were, what I achieved that year and what I wanted to be when I grew up...
 
4.  Sugar Bee Crafts has a tutorial on making a chalkboard sign tutorial.  I didn't know there was chalkboard spray paint.  I may need to go and check that out!
 
5.  Ashlee Raubach Photography did a photo shoot for her son's preschool class!  SO CUTE!  We did something like this for a family photo shoot last week, and we're super excited to see the pictures!  This would be fun to do at a birthday party or with your child's closest friends.

August 27, 2011

Milk Carton Blocks Tutorial

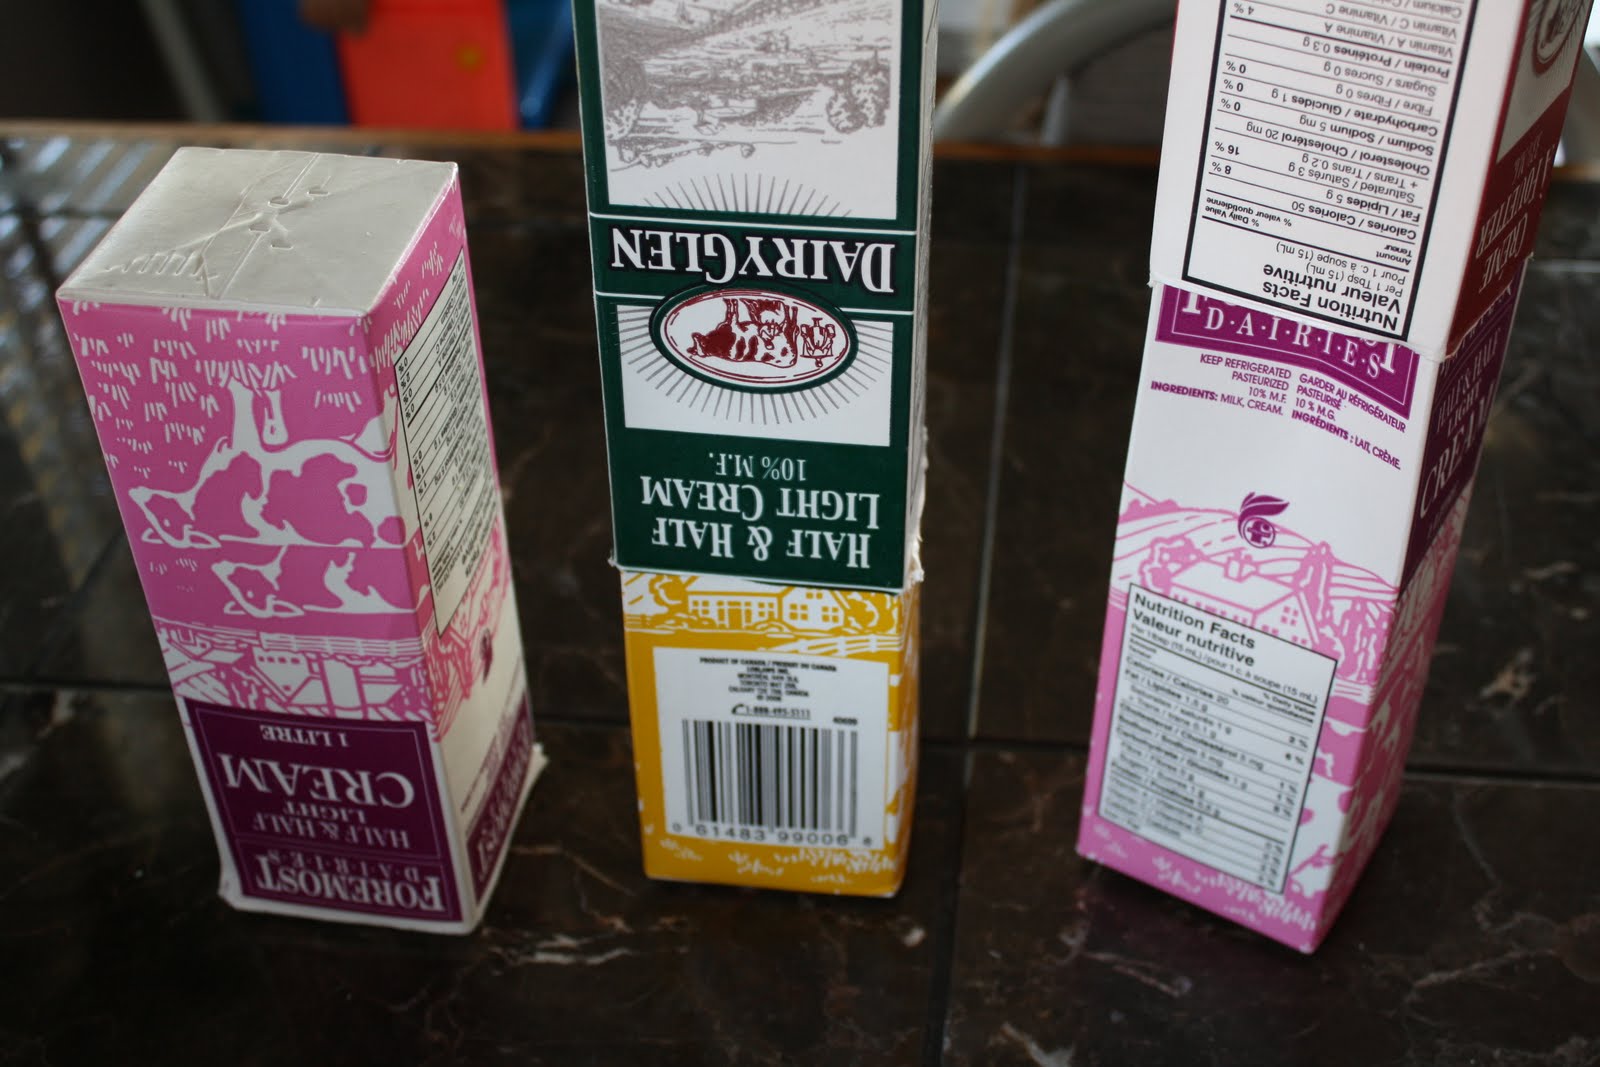
When I was a kid, I can remember my mom buying milk in glass bottles, in bags, and then in cartons.  It wasn't until I was older that she switched to buying jugs of milk, probably because my brothers and I LOVED drinking milk.  I still love it.  Now that I have my own family, we also enjoy drinking milk, and usually go through two 4L jugs in a week and a half (is that average??).  On occasion though, we do buy milk products (like cream, buttermilk, whipping cream, eggnog...) in cartons.  But what to do with those lovely cartons when you've emptied them?  They're not really recyclable, unfortunately.  
We make BLOCKS.  
My mom did this when I was a kid, and we used them for absolutely EVERYTHING!  They could be food for our kitchen, we could use them to build towers or houses, do bowling with them, make birdhouses...
Here's a quick how-to on making your own milk carton blocks.
 After you've finished using your carton, rinse it thoroughly and stash it somewhere until you have enough to make a couple blocks.  Each block requires TWO cartons.
Then open up the tops...
 Cut off the tops... you won't need them.
 Then take two cartons that are the same size.  Squish one slightly to insert it into the other, and PUSH until they form a block!
 Voila!  Your own milk carton blocks!  They are super durable for both indoor and outdoor play (although my dog has chewed them apart on occasion!)
Enjoy!

For more great ideas on what to do with leftover milk cartons check out Frugal Family Fun Blog

August 25, 2011

Blessing Bags

I stumbled upon the Kids with a Vision blog somehow... probably through a link off of Pinterest, as that seems to be where I like to spend time lately... But it is chalk-full of FABULOUS ideas to help change you and your children's perspectives of the people around them. I was so blessed and challenged as I read what this group of moms and a grandma are doing to change the hearts and minds of little ones to see others through the eyes of Jesus and to step outside of themselves and SERVE others in practical and loving ways. YES! Children can serve others! I can't wait to do some of these things with my kids... in fact, I may run to the dollar store today so that we can build some of our own blessing bags!
Photo: KWAV

Check out the link below...

KWAVs: Blessing Bags How To: Have you ever come across a homeless individual and felt totally uncomfortable? You see them and you know they are in need, but you are no...

August 12, 2011

When the Husband's Away, the Mom gets CREATIVE

My husband was away with work last week, so it was me ALONE with my children for three and a half days!  Yikes!  Not only that but it was HOT and we were all a tad bit grumpy... to say the least.
So, I put my thinking cap on to come up with some outdoor activities (inspired by one of my most FAVORITE blogs, Frugal Family Fun Blog) that involved WATER (because my kids decided they were tired of their pool - in 30 degree weather - whatever!) and SHADE to help fill our days and chase the grumpies away!
So, I mixed up a bunch of water in different containers with different food colouring in each container.  Dug out some old infant medicine droppers that I had kept, and away the kids went!  They MIXED and BLENDED and EXPERIMENTED with colours to their hearts content.  And the CLEAN-UP (once the colours had all been mixed to make a lovely murky black-brown colour?) involved dumping the water over the side of the deck onto the grass below!
 

 After the novelty had worn off from mixing colours, onto the next activity!  While the kids were busy, I quickly looked up instructions for folding paper boats, made some sails with toothpicks and construction paper and down to the pool we went for some SAILING races!


 YES!  It even enticed them into the water!
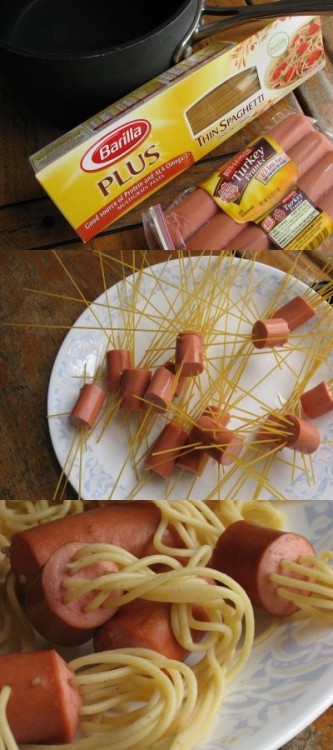
 Next was supper.  Aria wanted spaghetti, and I remembered something that I saw on Pinterest.  
Source: http://25.media.tumblr.com/tumblr_lao5cpVVlY1qbc1rpo1_500.jpgHotdog Spaghetti via Carmen on Pinterest
I thought it looked disgusting, but I knew the kids would LOVE it, and they would be able to help make it.  All that's required for this child-pleasing recipe is dry spaghetti and hotdogs.
 Simply poke the noodles through the chopped up, uncooked hotdogs (be careful, the noodles do break quite easily).

 BEFORE: kind of looks like porcupines...


 AFTER: looks more like a limp spider or jellyfish!
Needless to say, I made my own spaghetti (sans hotdogs) but the kids really enjoyed making their own supper, and thought it was great fun to eat!